A content cluster in the form of a grid or tiles is an excellent way to organize and present information attractively and clearly. In this guide, you’ll learn how to do it using WordPress’s default editor, Gutenberg, without any plugins.
Creating a Content Cluster Manually
Step 1: Create a New Page or Post
- Access your WordPress dashboard.
- Create a new page or post: go to Pages > Add New or Posts > Add New, depending on where you want your content cluster.
Step 2: Add a Columns Container
- Add a columns block: in the Gutenberg editor, click the “+” button to add a new block or type /columns in the editor. Select Columns from the block menu.
- Select a column structure: choose the layout you want for your grid. For example, select a 3-column layout for three tiles per row.

Step 3: Add Content to the Columns
- Add content blocks: inside each column, you can add blocks such as images, headings, paragraphs, and buttons. Click the “+” button within a column to add a block.
- Add images: select the Image block and upload an image or pick one from your media library.
- Add headings and text: add a Heading block for the tile title and a Paragraph block for a short description.
Example for this post: I added an Image block, a Heading block, and a Paragraph block.

Step 4: Make the Elements Clickable
- Add a button block: to make the tiles clickable, you can add a Button block under the description in each column and link it to the desired URL.
- Link images and headings: you can also make the image or heading clickable. Click the image or heading and use the Link option in the toolbar to add the URL.

Step 5: Customize the Style
- Adjust layout: use Gutenberg’s layout options to set spacing, alignment, and other styles for the columns and individual blocks.
- Add backgrounds and borders: you can add background colors and borders to the columns to improve visual appeal.
If your WordPress theme does not allow adding borders or spacing via the editor, or you want to customize styles with CSS, give each column block a class name in the Additional CSS Class(es) field under Advanced. For example, I named one column column-fruits.
Add your custom CSS: go to Appearance > Customize > Additional CSS and add CSS code. Example:

/* Column block styles */
.column-fruits {
border: solid 1px #FFDFB5;
box-shadow: 3px 3px 10px #E6E6E6;
border-radius: 10px;
background-color: #FFF9F2;
transition: ease 0.1s;
}
/* Column image */
.column-fruits img {
border-top-left-radius: 10px;
border-top-right-radius: 10px;
}
/* Hover effect */
.column-fruits:hover {
box-shadow: 6px 6px 15px #D9D9D9;
-webkit-transform: translateY(-2px);
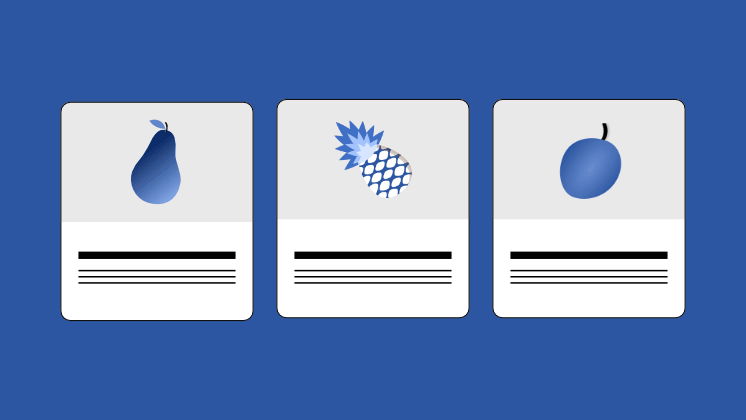
}Final result example:
Peras
Descripción.
Piñas
Descripción.
Melocotones
Descripción.
Creating a Blog Post Cluster Using the “Query Loop” Block
The Gutenberg Query Loop block allows you to display a list of blog posts in a grid or tiles. It’s a powerful and flexible tool to group and present dynamic content based on categories, tags, or dates.
Step 1: Create a New Page or Post
Go to your WordPress dashboard and create a new page or post as described above.
Step 2: Add the Query Loop Block
- Add the Query Loop block: click the “+” button, search for Query Loop, and insert it. This block contains three sub-blocks: Post Template, Pagination, and No Results.
- Select a layout: choose a pre-defined grid or tiles layout that suits your needs.

Step 3: Configure the Query Loop Block
Adjust these settings in the Query Loop block:
- Posts per page: how many posts to show
- Offset: 0 to show all posts, 1 to hide the latest post, 2 to hide the last two posts
- Maximum pages: limit how many pages to display even if more posts exist
In the Post Template block, you can display posts in a list or columns and set the number of columns in the right sidebar options.
Add the elements you want to display in each post:
- Featured Image: add the Featured Image block
- Post Title: add the Post Title block
- Excerpt: add the Excerpt block for a post summary
- Read More button: add a Button block linking to the full post
By default, post elements are not linked. Select them and enable Link to Post in the right sidebar.
Step 4: Filter Query Loop Content
With the Query Loop block selected, go to the right sidebar to set filters:
- Categories: choose which categories to display
- Tags: filter posts by specific tags
- Order by: sort posts by newest or oldest
Step 5: Customize Cluster Style
- Adjust layout: use Gutenberg layout options for spacing, alignment, and styles for the Query Loop and individual post items.
- Add backgrounds and borders: customize visually using the editor or CSS if your theme doesn’t allow editor-based styling.
Step 6: Publish
Preview your layout, make sure everything looks correct, and click Publish to make your content cluster live.